
Joel's Computer Project
| Home | www | Parts | www | Assembly | www | Setup |
| Step 1 Drive Cage |
www | Step 2 Custom Cables |
www | Step 3 Case Modification |
www | Step 4 Motherboard |
www | Step 5 Making Connections |
Step 5: Making Connections
OK, I've gotten pretty far since the last update, I just didn't document it. No biggie since much of it was temporary (messy wires, defective equipment, etc.). I guess it was sort of a test run. I figured out a few things I did and didn't want to do, things I wanted to change, and how to do stuff.
What you'll see (mostly) is that I reinstalled the drive cage (the new unbroken one), lowered hard drive#1 and removed hard drive#2.
I lowered the first one to make room for an idea I might try. I gutted my old computer and saved the parts. I figured I could use the old hard drive just for backing things up. Kind of using it like a tape drive. I usually back things up to a separate partition but that doesn't help if there's a hardware failure. I back things up to cd too, but having it there could be handy. I've been told that can bog down the system so if it doesn't work I'll get over it and just use cds. I removed the second drive because it was defective. Bad outta box--it happens. The replacement is already on the way and I should have it by the end of this week. Of course that'll mean a little disassembly but that's just how it'll be. Also, I've ordered some more modification stuff from
OK, time to get started. Keep in mind, I already put this all together once but the wires were totally out of control. Yes, wire management starts with the first wire. I'm pretty sure I can keep it neat with just wire ties & these cable sticky things. Also, I'll stick some wire ties through some case holes I know I won't be using. I decided to stick the sticky things to the power supply and dvd drive. By the way, I'm just getting the wire ties clicked on enough to catch, making hoops. I'll tighten them up at the end.
 |
 |
 |
|
I started with the front panel stuff. This includes the power switch, reset switch, power led, hard drive leds, and front usb ports. Here's something stupid, the case comes with two hard drive leds (with holes already drilled) but the motherboard only has one place to plug in. I guess one'll be extra. The front usb ports (circled in yellow) can only plug in one way but the switches & leds aren't keyed and there's nothing in the manuals to tell me so I just had to guess. I already knew that from one of the tutorials I read. It went on to say that nothing would blow up if you get it wrong so I just plugged them in, then changed them all to the right way. They can plug in either way, but only work if you get them right. It's easy enough to figure out, like if the power and reset switches don't do anything, hard drive led lights up with no hard drive connected... The manual did show me which one plugs in where (circled in red), just not which way. I also installed the little PC speaker (which came with the case) but musta forgot to take a picture of it. |
 |
|
No more putting it off, it was time to hook up the important stuff. First up was the giant power cable and the little 12 volt connector that go directly to motherboard. |
 |
| Follwed by the IDE cables for the DVD & floppy drives. |  |
 |
I couldn't get a decent picture of it but the power supply has two fans and they get connected to the motherboard. I thought it was a little stupid at first since its whole job is to SUPPLY POWER but I later figured it out. You may have noticed that all the fan cables are 3-conductor wires. They're power, ground, and RPM monitor/control. The fans (are supposed to) plug into the motherboard so the BIOS can monitor their speeds. On my first hookup I did it the right way until I figured out how that fan controller works, which sort of circumvents the motherboard's manual (and warranty probably). More on the fan controller later...
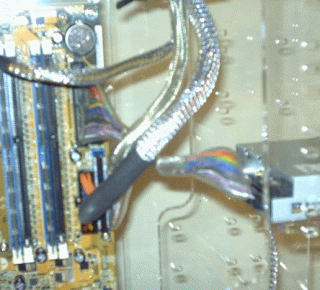
| Next, I fed one leg off the power supply and fed it through the wire tie hoops. I plugged the first connector into the lighter, the second into the first dvd drive, and the third onto the second dvd drive (circled in red). |  |
| If you remember from the page on custom cables, the lighter/cupholder has kind of an odd looking cable. Well the yellow circle in the picture above is the power passthrough of the lighter power wire, basically a built in y-connector. |  |
| The fan controller came with this power adapter. After I sleeved it, I plugged it into the pass through from the lighter and sent smaller end (same coneector as floppy power) to the fan controller. |  |
 |
| At this point I realized I forgot to attach the SATA hard drive cable. Notice it only needs to be about 6" but the shortest I could find was 18". I just tied up the slack with a wire tie. Good enough. If I don't like it it'll only take a second to change but it'll be fine. |  |
| The fan controller came with four of these thermal probes. That's how it monitors the temperatures in different areas of the case. Then, you just connect the power cord from the corresponding fan to the controller. It can handle four fans or groups of fans, CPU, VGA, HDD, and Case. You can't change the way they're labelled so I just connected them to the ones that'll make sense to me later. |  |
| I taped one to the bottom of the lower DVD drive |  |
and another one to the hard drive. |  |
| At this point I noticed I hadn't run any power to the hard drive or floppy drive. Ooops. The motherboard came with two standard power to SATA power adapters so I sleeved one. Actually I cheated on this one. I couldn't figure out how to get the SATA connectors off so I just slipped the sleeve over the whole thing and used electrical tape instead of heat shrink. Anyhow, I'm not %100 sure how the power cords are going to reach all the drives so I didn't knock myself out making it perfect. |  |
 |
So, I got back to the thermal probes. Unfortunately, those pictures came out totally unusable. And you've seen some pretty bad pics I called "good enough." I taped one of them to the video card and stuck the other one in the CPU's heat sink. I also routed those power cords to the fan controller.
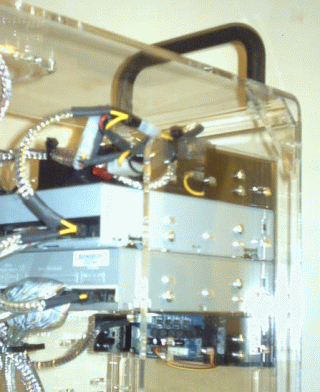
So here's a look at the back of the fan controller with everything attached (not too neat yet).

So that's just about everything. The only things missing are the replacement hard drive, extra hard drive (which I haven't completely decided on yet), the correct length audio cables, and other modifications I plan to get to later.
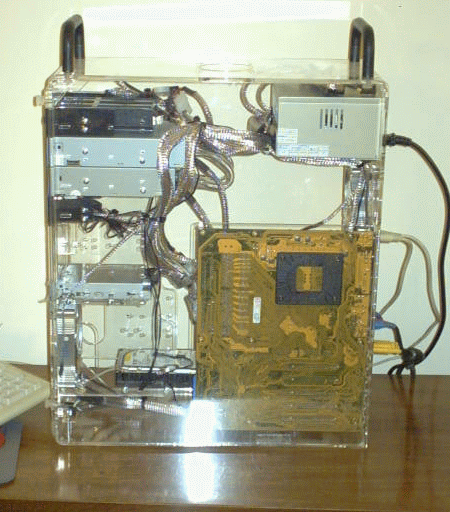
So here's the case with almost everything in it.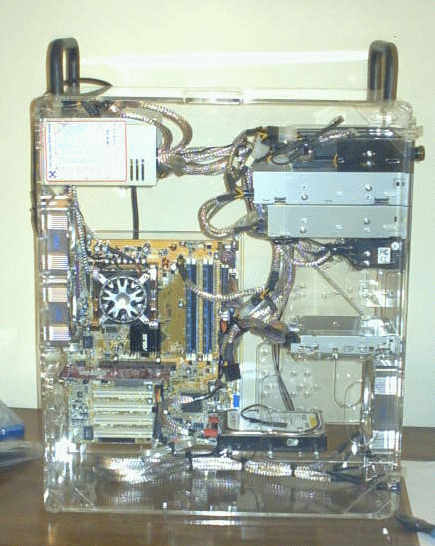 |
And here with the short audio cables.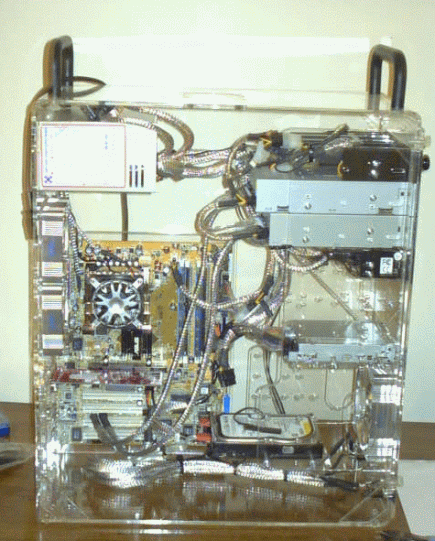 |
The audio cables are long enough to reach, but too short to make neat. That's why I ordered the longer ones. I didn't bother to tie them up like the other wires since these are just temporary.
So, now it's time to attach the easy stuff (mouse, keyboard, monitor, speakers, lan, & power). I'm going to wait until the replacement hard drive comes in before using the wireless keyboard and mouse so I'm just using leftovers for now. Also, for the time being, I'm reusing my old monitor & speakers until I'm sure everything's OK. Then, I'll get a real video card and new monitor & speakers. I'll probably try the motherboard's onboard audio with the new speakers then decide if I should get a real sound card.
 |
 |
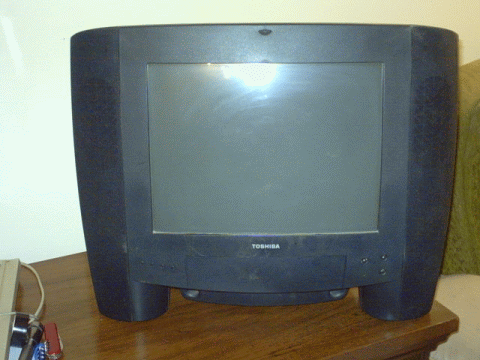 it has built in speakers & sub |
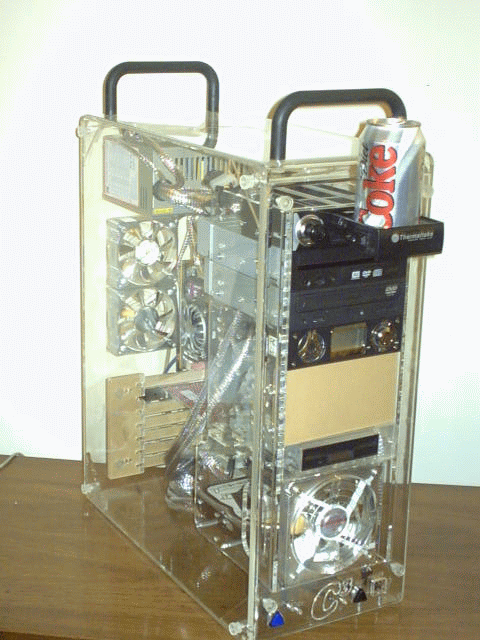
So, here are a few more views of mostly completed assembly.
 |
 |
 |
 |
Now keep in mind, I've already gotten this to work (sort of), but at this point of the process, the next step would be the test run. I think that does it (assembly-wise) till new stuff comes in so I'll just have to wait and see what shows up next.
| E
Step 4 Motherboard |
Assembly |