Joel's Computer Project
| Home | www | Parts | www | Assembly | www | Setup |
| Step 1 Drive Cage |
www | Step 2 Custom Cables |
www | Step 3 Case Modification |
www | Step 4 Motherboard |
www | Step 5 Making Connections |
Step 2: Custom Cables
All right, my order from FrozenCPU has arrived. I bought rounded cables, custom sleeved cables, and sleeving supplies. I'll start with the rounded cables.
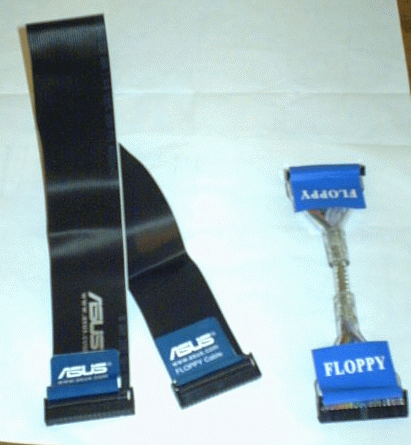
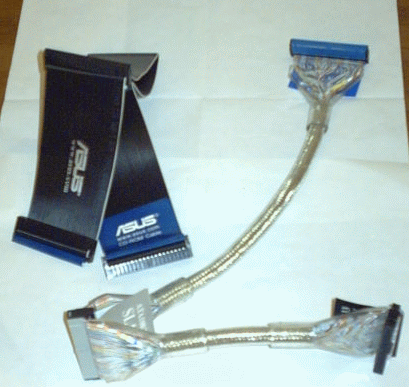
The motherboard came with hard drive, dvd, floppy, and SATA cables. I won't be using any of them. I'm not going to need the hard drive cables since I got SATA hard drives. As for the DVD drives and floppy drive, I'm going to use rounded cables instead of the ribbon cables that came with the mobo.
Rounded cables are better for three reasons.
| Floppy Cable | DVD Cables |
|
|
Those flat ribbons cables can block the fans and it's tough to make them neat since they just bunch up.
| OK, I admit it. I bought the SATA cables just cuz I could get them in silver. It wouldda been nice if it came with black connectors like the red ones that came with the mobo, but I've decided that the right color cable is more important. | 
|
As for the custom sleeved cables and the sleeving supplies, there's pretty much just one reason: They look cool. I ordered stuff I needed anyway, just custom sleeved where possible.
| I needed y-connectors & extension cables for the fans and audio cables for the DVD drives so I ordered those custom sleeved. I needed the y-connectors since I have 3 case fans and the fan controller can monitor them as a group. Also, the fans' power cords are really only long enough to reach the motherboard, not the front of the case, so I ordered the extensions. The fan controller came with extensions but I ordered the custom sleeved ones before having tried to sleeve anything myself. I probably wouldn't've bought those if I had known that it wasn't that hard to do. The audio cables that came with the DVD drives were pretty shabby looking and too short to use anyway, so I ordered longer ones (pre-sleeved). |  |
That just leaves the wires I had to sleeve myself. I could pretty much figure it out myself but I spotted a step-by-step here:
http://www.virtual-hideout.net/guides/cable_sleeving/index.shtml
They have tons of computer tips. Their main page is Virtual Hideout
Here are the tools & supplies I used for wire sleeving.
 Wire Sleeve |
 Heat Shrink |
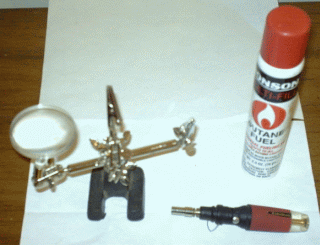 Mini-Blowtorch & Helping Hand |
So, I tried it on a practice wire. The fan controller came with a couple of wires I knew I wasn't going to need so I used one as a test wire. I was trying to learn so I didn't really document the process for this test.
|
There were 3 of these wires I wasn't going to need so here's one I sorta practiced on and an untouched spare. |
 |
| So, now it was time to try it on a wire I really need. I decided to start with the CPU fan's power cord. |  |
 |
| First, I used a tiny screwdriver to pop off the end then cut a piece of wire sleeve to length. |
 |
| Next, I fed the wire throught the sleeve. I had to kind of inchworm it on. |  |
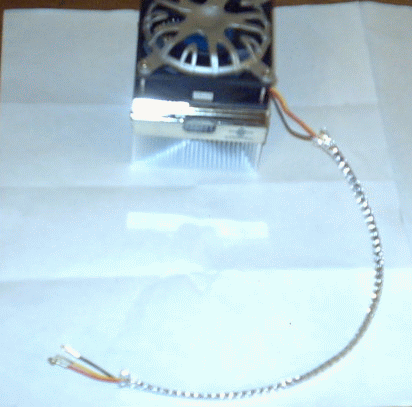 |
| Then, I cut 2 pieces of heat shrink (one for each end), slid them over the wire, and melted them with a lighter. |  |
 |
| After that, all that was left was to put the connector back on the fan cable. |  |
Well, I did that first one holding the wire in my hand and waving my lighter around to melt the heat shrink. I realized that was gonna take forever and probably not turn out so great so that's when I got my soldering kit to do the rest. For the rest of the wires I was going to sleeve, I put the sleeve on the same way, but then clamped the wire in the helping hand thing. My soldering iron has a mini-blowtorch attachment so I used that to melt the heat shrink. It was a lot easier and I think the wires came out pretty good that way.
 |
 |
| OK, remember this picture from the last page... |  |
Well, after sleeving I think they look a lot better
 |
 |
| I should have taken a picture of this one before sleeving it but I guess I didn't think of it. It was kinda tough to do since it has 3 seperate segments and they're not entirely continuous. It's actually the power connector for that lighter. Notice the in-line fuse (car style). It doesn't have to be perfect since I don't really think I'm going to use it. I just got it cuz I thought it was funny. |  |
Lastly, there's the power supply. I ordered this one pre-sleeved since I didn't really want to have to do this one myself.
 |
 |
 |
 |
Well, that's pretty much it for custom cabling. The only other thing about it is that FrozenCPU was all out of 80cm audio cables so they sent me the 50cm cables instead. They'll send me the right ones when they come in but for now, I'll use the shorter ones. I just won't be able to make them look as neat.
| E
Step 1 Drive Cage |
Assembly | Step 3
F Case Modification |